
From Compost Bins to Solar Dehydrators — Sustainable Builds That Pay for Themselves
Introduction
There’s a certain satisfaction in looking at something useful on your homestead and knowing you built that with your own two hands (and possibly a few choice words when the drill bit slipped). DIY self-sufficiency projects not only save you money but also reduce your dependence on store-bought solutions, helping you live more sustainably. From compost bins that turn kitchen scraps into garden gold to solar dehydrators that let the sun preserve your harvest, these projects are budget-friendly, beginner-friendly, and just plain satisfying.
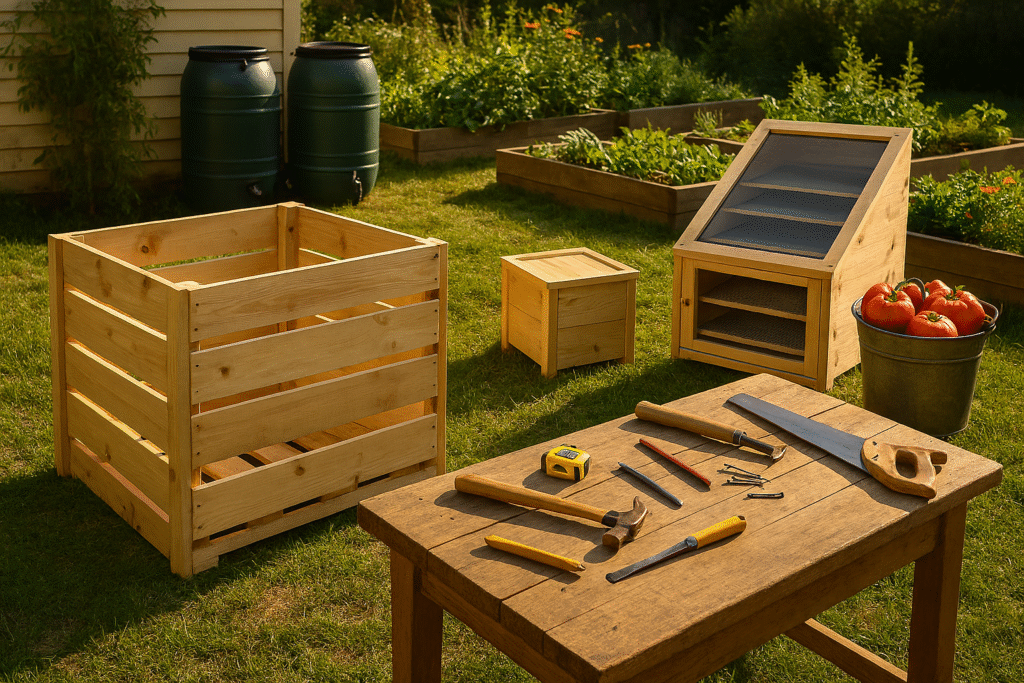
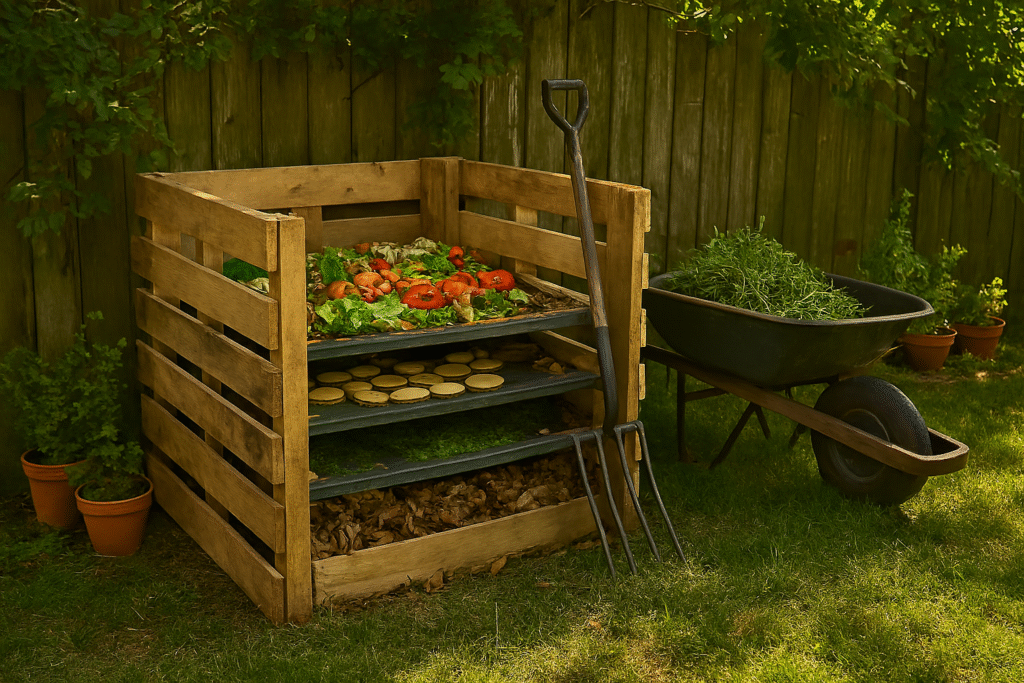
1. DIY Compost Bin
Why it’s worth it: Store-bought compost bins can cost a small fortune, but making one yourself from pallets, barrels, or even old trash cans can be nearly free. Plus, you’ll keep organic waste out of landfills and turn it into nutrient-rich soil.
Materials You’ll Need:
- Wooden pallets, a large plastic barrel, or a sturdy trash can
- Drill with ventilation bit
- Screws and hinges (if building a multi-bin setup)
- Compost thermometer (optional, but makes you look like you know what you’re doing)
Quick Build Tips:
- Drill several holes for airflow — compost needs oxygen.
- Keep your bin in partial shade to prevent it from drying out.
- Aim for a mix of “greens” (food scraps, grass) and “browns” (leaves, cardboard).
Product Picks:
- Kreg Pocket-Hole Jig (for secure pallet builds)
- Jobe’s Organic Compost Starter (jumpstarts decomposition)
- Heavy-duty gloves (trust me, banana peels get slimy)
2. Solar Food Dehydrator
Why it’s worth it: Forget plugging in an electric dehydrator — a solar model uses free sunshine to dry fruits, vegetables, and herbs. You save on electricity and get food that lasts months without refrigeration.
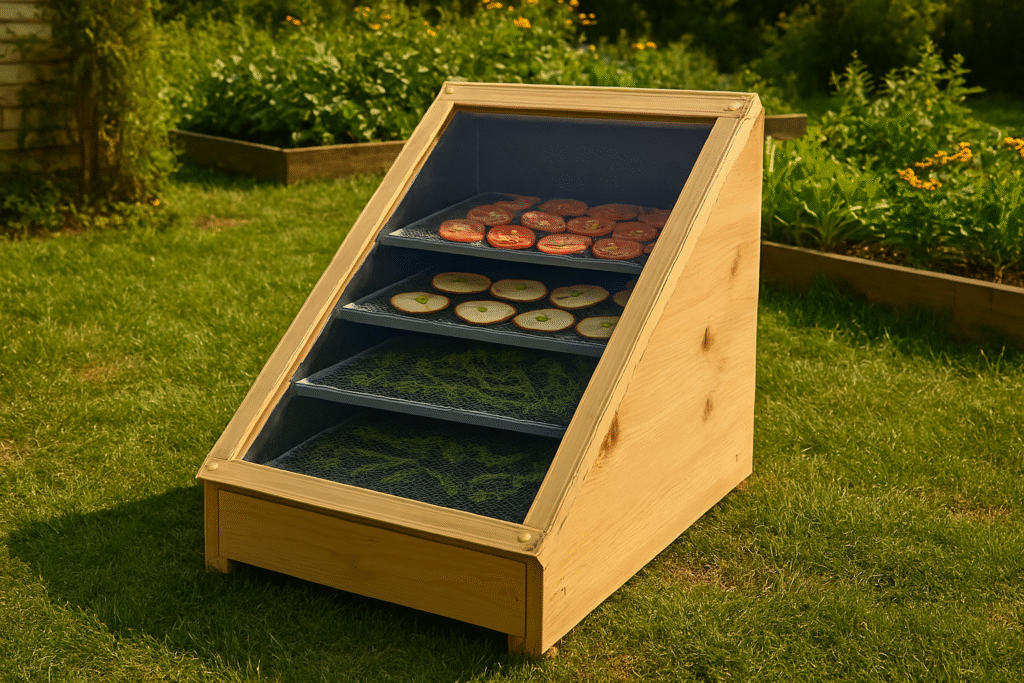
Materials You’ll Need:
- Plywood or scrap lumber for the frame
- Clear polycarbonate sheet for the solar window
- Black, non-toxic paint (absorbs heat)
- Mesh screens for trays
- Hinges and latches
Quick Build Tips:
- Tilt the dehydrator to face true south (in the Northern Hemisphere) for maximum sun exposure.
- Paint the interior black to absorb heat and speed drying.
- Make sure your screens are food-safe and pest-proof.
Product Picks:
- Eco-Worthy Solar Fan Kit (improves airflow and speeds drying)
- Food-grade mesh screens from a local hardware store or online
- Low-VOC black paint for a safe, heat-absorbing interior
3. Rain Barrel System
Why it’s worth it: Collecting rainwater cuts your water bill, reduces runoff, and gives you free irrigation for gardens or livestock.
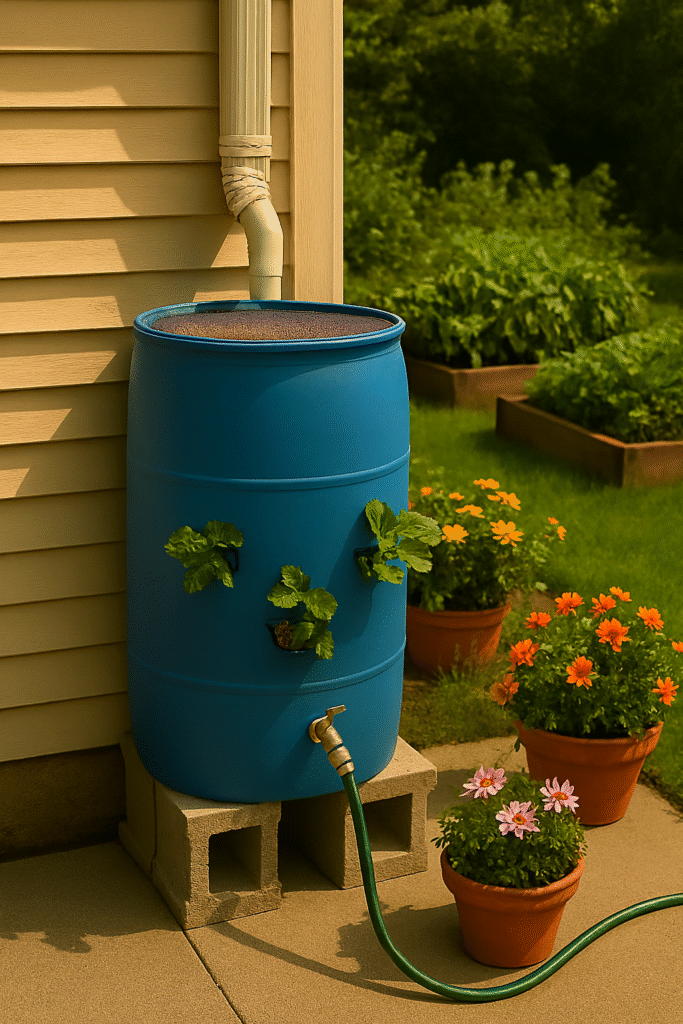
Materials You’ll Need:
- Food-grade barrel (55 gallons is ideal)
- Downspout diverter kit
- Spigot and Teflon tape
- Screen or filter to keep out debris
Quick Build Tips:
- Elevate your barrel on cinder blocks for better water pressure.
- Use a fine mesh to prevent mosquito breeding.
- Link multiple barrels with PVC pipe for higher storage capacity.
Product Picks:
- EarthMinded Rain Barrel Kit
- Flexzilla Garden Hose (durable and kink-free)
- Gutter Guard Mesh to keep leaves out
4. DIY Solar Oven
Why it’s worth it: Cook bread, casseroles, or even slow-cook a stew without using electricity or propane. The sun does all the work — and it’s surprisingly effective.
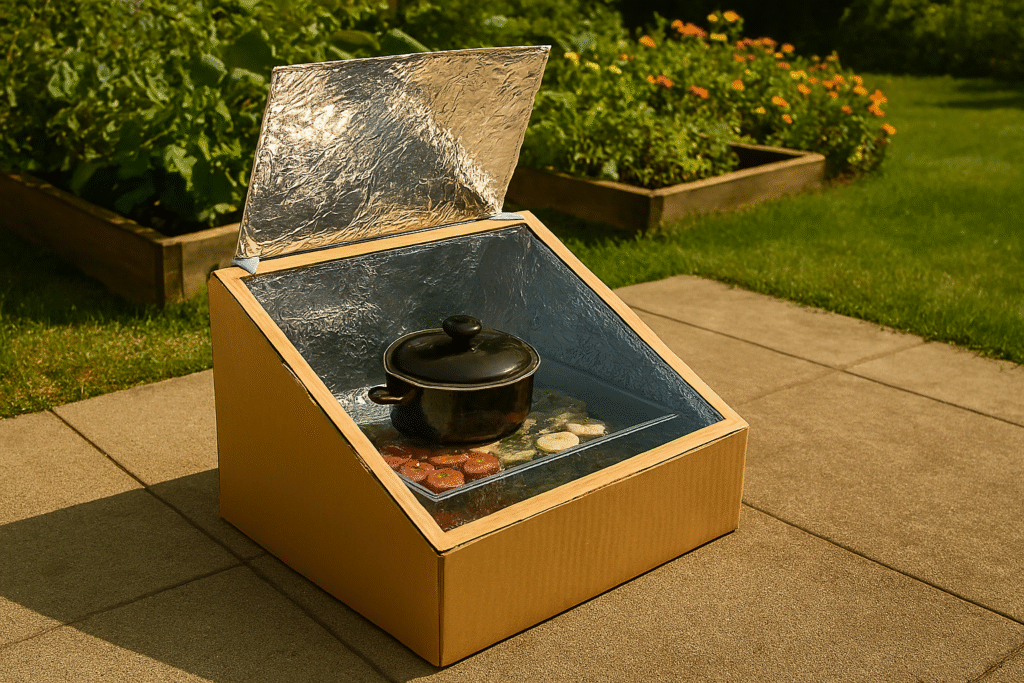
Materials You’ll Need:
- Cardboard box (or wooden crate)
- Aluminum foil
- Tempered glass or clear acrylic sheet
- Black cooking pot with lid
Quick Build Tips:
- Line the box with foil for maximum reflection.
- Position your oven toward the sun and adjust every 30–45 minutes for best heat.
- Use a thermometer to monitor cooking temps — solar ovens can hit 250°F–300°F!
Product Picks:
- Taylor Oven Thermometer
- Lodge Cast Iron Dutch Oven (retains heat beautifully)
- Reusable baking mats for easy cleanup
5. Vertical Garden Tower
Why it’s worth it: Perfect for small spaces, a vertical garden tower can grow herbs, greens, or strawberries in just a few square feet.
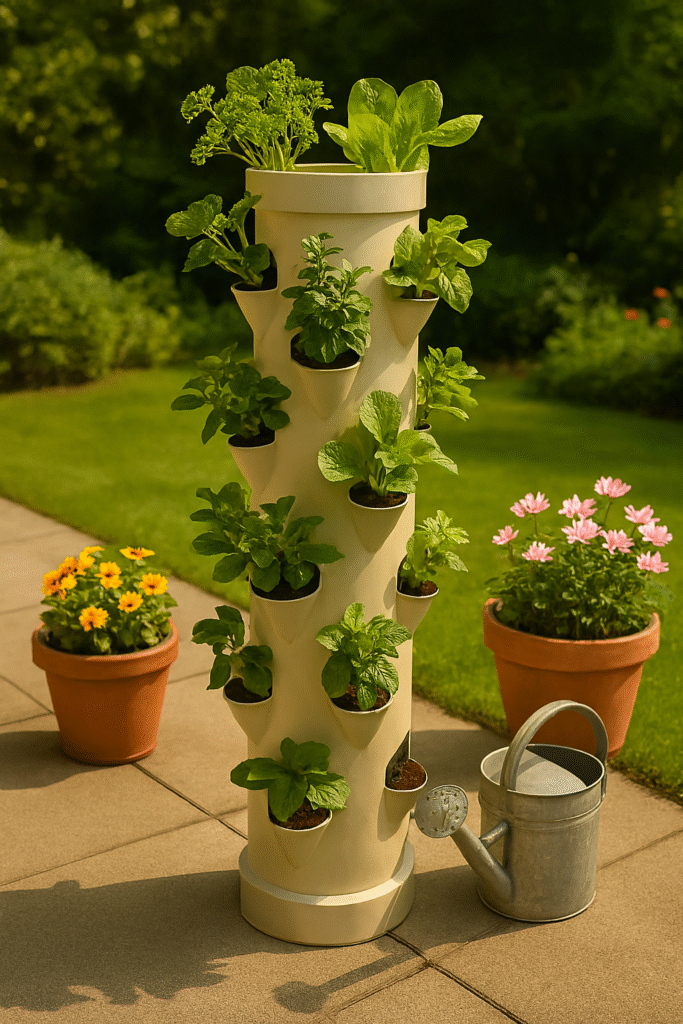
Materials You’ll Need:
- Large PVC pipe or stacked planting containers
- Drill with hole saw bit
- Potting soil and compost mix
- Plants or seeds
Quick Build Tips:
- Drill planting holes staggered around the pipe.
- Fill with a mix of compost and high-quality potting soil.
- Rotate occasionally so all plants get equal sun.
Product Picks:
- Black Gold Organic Potting Mix
- Rain Bird Drip Irrigation Kit (saves water)
- Burpee Herb Seed Kit
6. Vertical Potato Tower
Why it’s worth it: Potatoes love to grow underground, but they take up a lot of space. A vertical potato tower lets you stack soil and seed potatoes upward instead of outward — perfect for small yards or patios. Plus, it’s a fun way to impress your neighbors when you pull a tower of spuds out of the ground!

Materials You’ll Need:
- Wire mesh or sturdy chicken wire (to form the tower frame)
- Stakes or rebar to support the frame
- High-quality garden soil and compost
- Seed potatoes
- Mulch
Quick Build Tips:
- Start by planting seed potatoes in the bottom layer of soil inside the tower.
- As the potato plants grow, keep adding soil and mulch to cover the stems—this encourages more tubers to form.
- Make sure the tower is stable—secure the wire mesh tightly to stakes.
- Water regularly but avoid waterlogging to prevent rot.
Product Picks:
- Nasco Chicken Wire Roll (easy to shape and durable)
- Espoma Organic Compost (rich and nutrient-packed)
- Certified Seed Potatoes from your local garden center
7. DIY Cold Frame Garden
Why it’s worth it: Extend your growing season by weeks with a simple cold frame. This mini greenhouse traps heat and protects young plants from frost, giving your seedlings a cozy start in spring and a warm retreat in fall. Plus, it’s a low-cost way to get a jump on your garden without fancy equipment.
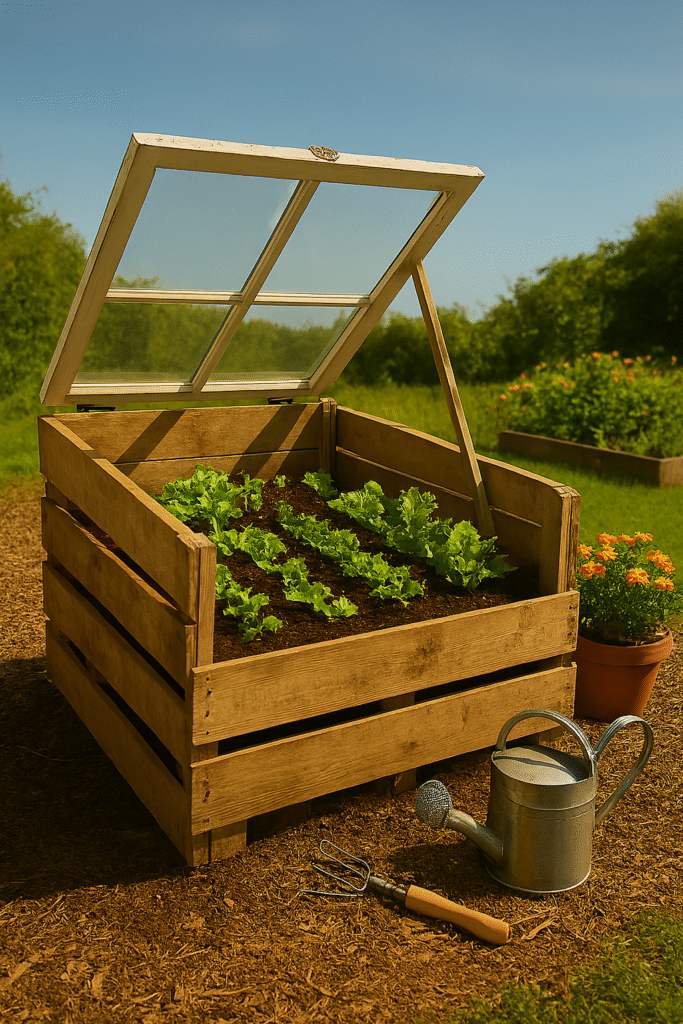
Materials You’ll Need:
- Old window frame or clear acrylic/plexiglass sheets
- Wooden pallets or scrap lumber for the frame
- Hinges (if you want a lift-top for ventilation)
- Weatherproof paint or sealant
- Straw or mulch for insulation
Quick Build Tips:
- Position your cold frame facing south for maximum sunlight.
- Use hinges to create a lid that opens easily for watering and airflow.
- Add mulch or straw around the base on cold nights to keep roots warm.
- Start hardy greens, herbs, and seedlings inside before transplanting outdoors.
Product Picks:
- Rust-Oleum Exterior Paint for weatherproofing
- Heavy-duty Hinges from any hardware store
- Clear Polycarbonate Sheets for durable, shatter-resistant glazing
Final Thoughts
DIY self-sufficiency projects aren’t just about saving money — they’re about gaining the confidence to say, “I don’t need to buy that; I can build it.” Start small, maybe with a compost bin or rain barrel, and you’ll be amazed how quickly your skills (and your sustainable lifestyle) grow. Soon, you’ll be drying your tomatoes in a solar dehydrator, baking bread in a solar oven, and wondering why you didn’t start sooner.
Because nothing says I’ve got this like eating dinner you cooked with the sun, garnished with herbs you grew, watered from rain you collected, and served on a table you built yourself… just maybe not all on the same day.