 Choosing anchors for your walls might not sound like the most glamorous home project, but picking the right ones can be the difference between your shelves staying up or crashing down. I’ve seen wobbly picture frames, TV mounts that barely hang on, and curtain rods that just won’t quit pulling free—all because the wrong anchors were used. It doesn’t take much know-how to avoid those headaches, but knowing what to look for makes things a whole lot easier.
Whether you’re hanging art, mounting a TV, putting up shelves, or just trying to stop your towel rack from falling off the drywall, understanding anchors can make your projects smoother and way more reliable. This guide breaks things down so you get the right anchor every time, even if you’ve never used one before.
You’ll find simple answers to the most common wall anchor questions, learn about different types of anchors, and get my tips for matching anchors, drill bits, and fasteners to your wall type. By the end, you’ll be able to tackle any wall-hanging task with confidence.
Step 1: Identify Your Wall Type
Before grabbing any anchors, it’s really important to figure out what kind of wall you’re working with. The material inside your walls determines which anchors will hold up and which ones will just spin uselessly or rip out under weight.
Common Wall Types:
- Drywall (Sheetrock): Most interior walls. Easy to drive a nail into, but not great for holding heavy loads without some kind of anchor.
- Plaster: Usually older homes. Hard and crumbly surface, can be tricky for regular anchors.
- Masonry (Brick, Concrete, Block): Found in basements, exteriors, or garages. Very sturdy, but you need masonry anchors.
- Wood (Paneling, Studs): Sometimes you can drive screws directly into these without anchors, especially for small loads.
To check your wall, try poking a small hole in an out-of-the-way spot with a nail, or remove an outlet cover to see what material is behind it. Don’t forget: hitting a stud behind drywall changes how you install anchors too.
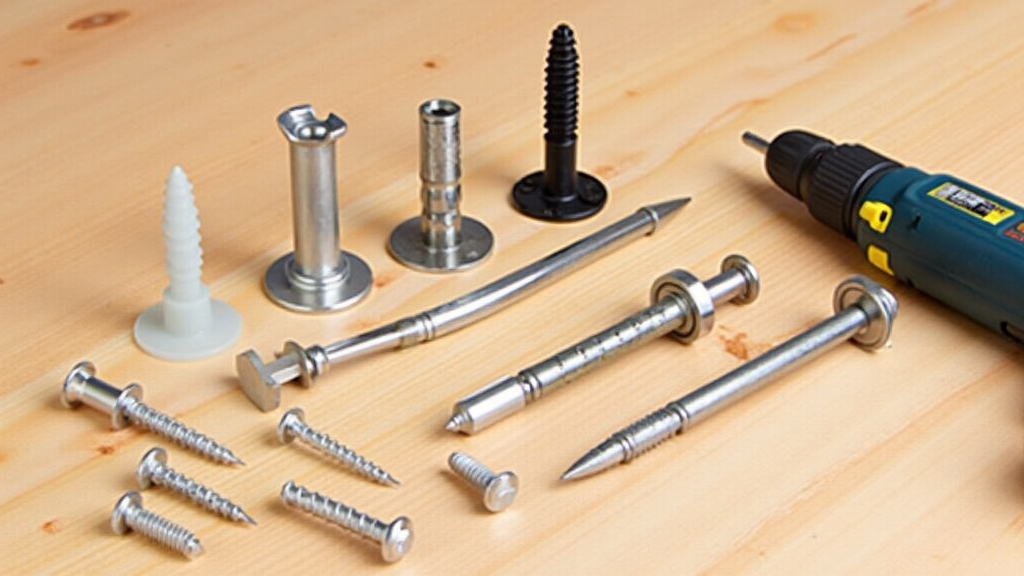
Step 2: Understand the Different Types of Wall Anchors
There are way more anchor types than you might expect. Here’s a rundown of the most common ones and what projects they’re good for:
Drywall Anchors
- Plastic Expansion Anchors: These are the basic plug style anchors found in allinone kits. Good for lightweight items (think up to 15 pounds).
- SelfDrilling (Threaded) Anchors: These are the chunky, screwlike plastic or metal anchors you screw straight into drywall without predrilling. They can hold medium weights (around 25 to 75 pounds, depending on size).
- Toggle Bolts: These have spring loaded wings that open behind the wall. Super useful for heavy shelves, big TV brackets, or anything over 50 pounds when you can’t hit a stud. Some versions use metal wings, others have plastic expanders. Always check weight ratings.
- Molys (Molly Bolts): Metal anchors that expand behind the wall as you screw them in. Great for medium to heavy items, especially on old plaster.
Masonry Anchors
- Plastic or Nylon Sleeve Anchors: For small to medium loads in brick or concrete. You predrill a hole, insert the sleeve, and then screw in.
- Concrete Screws: Like Tapcon, these drive straight into predrilled holes in concrete or brick. No anchor insert needed, but you do need a properly sized hole.
- Wedge/Bolt Anchors: For seriously heavy stuff like safes, plumbing rails, or heavyduty shelves in concrete or block walls.
Specialty Anchors
- Adhesive Anchors: Used mostly for brick/concrete where drilling is tricky. The anchor is glued in place with epoxy, then you screw into it. Handy for uneven or fragile masonry.
- SnapToggle Bolts: A newer type for drywall and hollow walls, with a metal channel that stays flat behind the wall and gives strong support with minimal hole size.
Step 3: Match Weight and Anchor Load Ratings
Anchor strength is a pretty big deal. All anchors come with a weight rating, and it’s based on the material of your wall.
- Light Duty (Up to 15 lbs): Small pictures, lightweight décor, hooks, or smoke detectors. Plastic expansion anchors or small threaded anchors work here.
- Medium Duty (15 to 50 lbs): Shelves, curtain rods, medium art. Threaded plastic or metal anchors, molly bolts, or double ended toggle bolts fit this category.
- Heavy Duty (50+ lbs): TV mounts, large mirrors, bookcases, or wall cabinets. Metal toggle bolts, lag shields, wedge anchors, snap toggles, or always into wall studs (sometimes with no anchors at all for wood screws).
Always check the box or packaging for the anchor’s load rating. When in doubt, go up a step; using a heavy anchor for a light object won’t hurt, but using a light anchor for a heavy object can end with broken drywall and broken stuff.
Step 4: How To Know Which Wall Anchor To Use
Ask Yourself:
- What is my wall made of? (Drywall, plaster, masonry, wood)
- How heavy is the object I’m hanging?
- Will it be subject to movement or pulling (like a coat hook or a towel rack)?
- Can I hit a wall stud behind the drywall? (Use a stud finder to check!)
If you can screw directly into a wall stud, skip anchors and just use wood screws. If not, match the anchor to wall type and expected weight. For drywall and light items, go with basic plastic or selfdrilling anchors. For medium or heavy items, toggle bolts and mollys are a safer bet.
Step 5: Find the Correct Drill Bit for Wall Anchors
Choosing the right drill bit is pretty straightforward but makes a big difference. The drill bit size should match the size of the anchor you’re using. Most anchor packs tell you which bit to use, but here are some tips I rely on:
- For plastic or nylon expansion anchors: Use a drill bit with the same diameter as the anchor body, not the head. So if the anchor is 1/4 inch thick, use a 1/4 inch drill bit.
- For selfdrilling anchors: Usually, no drill bit needed. The anchor drills itself into drywall. Use a screwdriver or drill on low speed.
- For toggle bolts or mollys: The hole should be wide enough for the closed anchor to fit through comfortably. Check the instructions for each anchor type.
- For masonry anchors (like sleeve or Tapcon): The packaging will list the correct bit size, but matching the anchor diameter works almost every time. Masonry bits are needed for brick or concrete.
If you’re not sure, hold the anchor up to your drill bit—the two should be the same thickness, or the bit just slightly smaller. When in doubt, go smaller; you can always widen the hole if you need to.
Step 6: Installing Wall Anchors the Right Way
Getting anchors flush and seated solidly matters for strength and neatness. Here’s how I like to do it for different wall materials and anchor types:
General Steps:
- Mark your spot with a pencil. Use a level or measuring tape for multiple items (like shelves).
- Drill the hole to the proper depth and width.
- Blow out dust, especially important with masonry. Dust prevents anchors from seating tight.
- Insert the anchor by hand (plastic) or with a screwdriver (selfdrilling). The anchor should feel snug.
- For toggle or molly bolts, gently tap into place if needed, or squeeze the anchor with pliers if the instructions suggest.
- Make sure the anchor is flush with the wall surface; this is really important for drywall anchors. If it sticks out, your screw may not grab properly. If it’s sunk in too far, it can weaken the wall. Don’t overhammer or force; a little effort should be enough.
- Install your screw or bolt, tightening until snug. Avoid overtightening, which can spin or strip the anchor out of the wall.
Step 7: How to Figure Out Drywall Anchor Size
Getting the anchor size right can feel confusing with so many options at the hardware store. Here’s how I decide what size to grab:
- Match the screw size: Each anchor has a matching screw size. Kits often include both; otherwise, check the package.
- Thickness matters: Choose an anchor diameter roughly 1.25 to 1.5x the diameter of the intended screw for decent holding power in drywall.
- Length: For heavy items, longer anchors hold better and spread the load farther into the wall.
- Visual reference: If you have an existing anchor hole, take a leftover anchor to the store and match by sight, or measure with calipers or a small ruler.
- If in doubt, bigger anchors are usually stronger, but don’t drill a hole so huge that there’s barely any drywall left to grip.
Step 8: Common Questions About Wall Anchors
How do I know which wall anchor to use?
Start with the wall type and the weight of the item. Use plastic or selfdrilling anchors for light things on drywall, toggle bolts or mollys for heavy items on hollow wall, and masonry or wedge anchors for brick or concrete. Anytime you can use a stud, skip the anchor entirely.
How do I find the right drill bit for wall anchors?
Check the instructions on the anchor packaging. If there aren’t any, use a bit the same diameter as the anchor body (not the head), or just a tad smaller. For masonry, use carbidetipped masonry bits.
Should drywall anchors be flush with the wall?
Yes, anchors should sit right at the wall’s surface; no sticking out and no sinking in deep. This keeps the anchor from spinning and gives the screw enough grip. With toggle bolts, the cap may sit on top of the wall, but the wings need to be expanded inside the hollow.
How do I figure out drywall anchor size?
Check what size screw you plan to use, check your object’s weight, and pick an anchor with a matching or slightly stronger rated capacity. If you’re hanging new items and unsure, bring the screw to the hardware store and ask for help. It’s a super common question and staff usually know their stock pretty well.
What are the different types of wall anchors?
- Plastic expansion anchors (light duty)
- Selfdrilling/Threaded anchors (medium duty)
- Toggle bolts and molly bolts (medium to heavy duty)
- Masonry sleeves, wedge/bullet anchors, and concrete screws (for brick, block, or concrete)
- Adhesive and specialty anchors for tricky situations
Always check the packaging or manufacturer’s instructions for guidance.
Troubleshooting and Pro Tips
- Anchor spins in the wall? Either the hole is too large or the drywall crumbled. Use a larger anchor or try a toggle/molly bolt that expands behind the wall.
- Anchor pulls out under weight? Weight might exceed the anchor rating or was installed in crumbly drywall. Step up to a stronger anchor or find a wall stud.
- Nothing lines up with a stud? Use toggles or mollys in drywall between studs, and always triplecheck your measurements before drilling.
- Unexpected pipes or wires in the wall? Use a stud finder with AC detection or a cable/pipe Finder. If you hit something hard and metal while drilling, stop immediately and investigate.
- Have leftover holes? Patch small mistakes with spackle or wall repair patches, let dry, and repaint.
Don’t stress if your first try isn’t perfect; pull out the anchor, patch the hole, and try again a few inches over. I mess up anchor holes sometimes and have learned that patching is quick and easy.
Next Steps for Reliable Wall Hanging
Picking and installing the right wall anchors gets easier the more you do it. Start with a simple project like hanging a photo or a small shelf, and build up to TV mounts or heavy cabinets as you get the hang of it. Gather a basic anchor selection in your toolbox, keep a sharp drill bit handy, and always check weight and wall type before you start.
Your Wall Anchor Game Plan:
- Figure out your wall type and the weight of what you’re hanging.
- Pick the anchor that matches both; don’t be afraid to go heavyduty than you think you need.
- Choose the right drill bit and prep your hole properly.
- Install the anchor flush, not sticking out or buried deep.
- Use the matching screws, tighten everything up, and check for wobble before loading up your shelves or décor.
The right anchors give you confidence that anything you hang will stay put, no matter what. Happy hanging!
Now that you’ve got the basics down, keep these steps handy for every wall hanging project. From lightweight art to massive bookshelves, you’ll make sure everything stays safely in place. Share your tips or ask questions with fellow DIYers any time—there’s always more to learn about nailing the perfect wall anchor setup.


Leave a Reply